Policy Repository Module
Last updated May 19, 2026
The Policy Repository is a centralized workspace for managing policies, procedures, and related documents. It automates summaries, approvals, version control, and regulatory alignment.
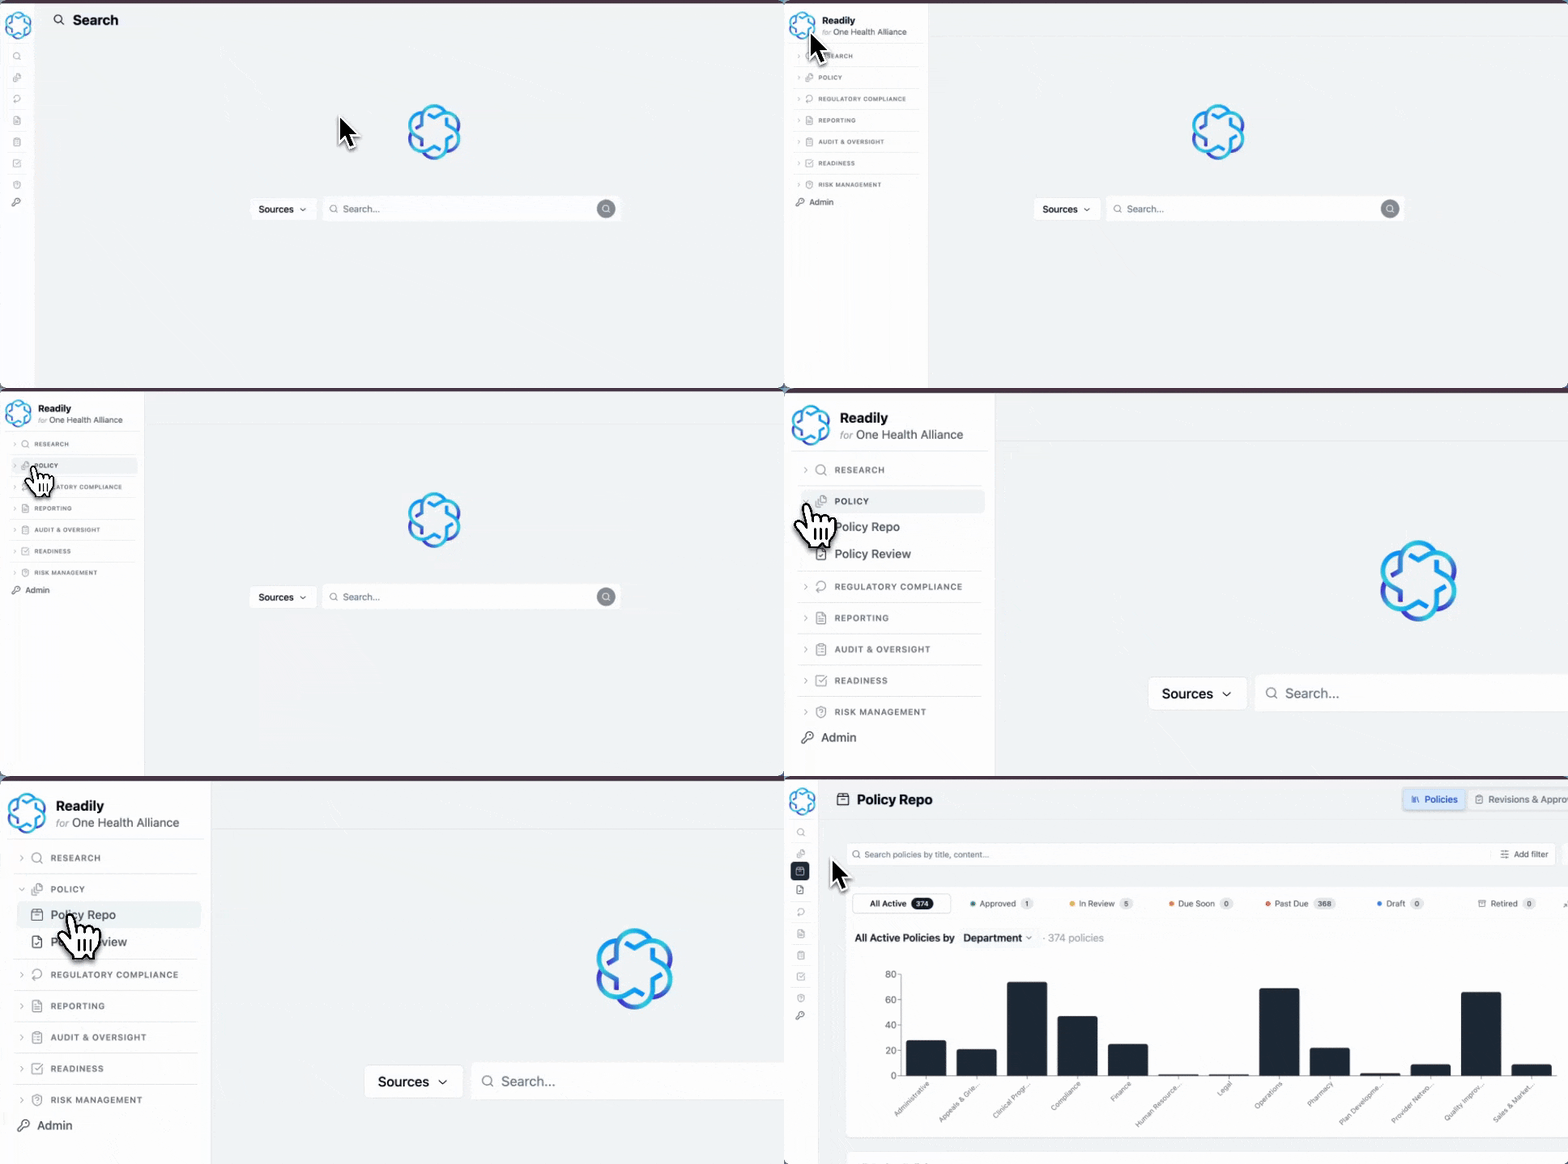
How To Access the Policy Repository
- Log in to Readily: https://app.readily.co/
- From the main navigation menu, under Policy select Policy Repo.
- You will see a the Dashboard for Policy Repo, a centralized library containing all your P&Ps (Policies and Procedures).
Policy Repository Dashboard – Overview
The Policy Repository dashboard provides a director-level view of all policies across the organization. Its purpose is to quickly understand the overall policy status across multiple functional areas.
Filtering the Dashboard (Status View)
Users can filter the dashboard using the status categories at the top. Each selection updates the entire view to show where policies stand across the repository:
- All Active – Displays the full set of all active policies across all functional areas
- Approved – Shows policies that are finalized and in effect
- In Review – Highlights policies currently under review or are in need of approval
- Due Soon – Surfaces policies approaching their review or expiration date
- Past Due – Identifies policies that require immediate attention
- Draft – Includes policies still being developed
- Retired – Shows policies that are no longer active
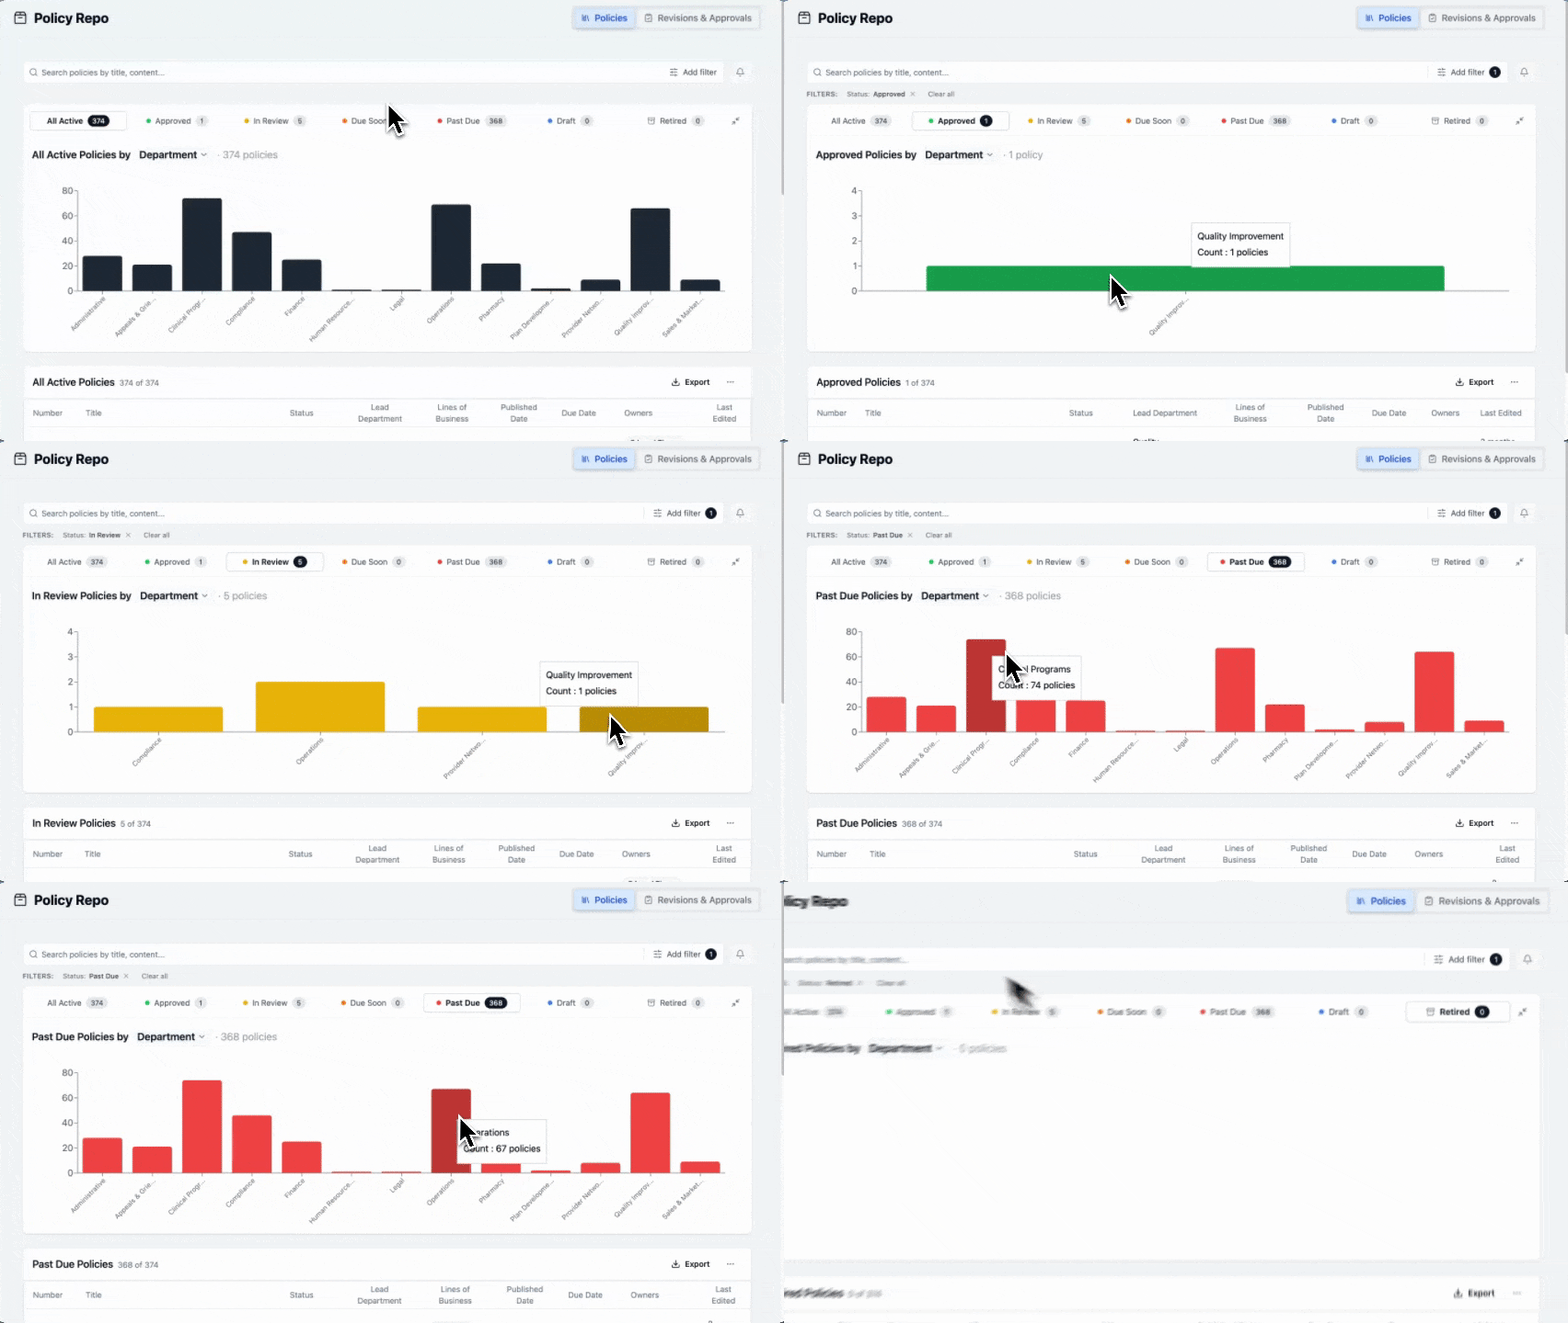
These filters allow users to quickly shift perspective and understand status distribution across the organization and key focus areas.
Getting to Individual Policies
To access each policy individually, scroll down to the bottom half of the dashboard. NOTE: The policies displayed will reflect the filtered option in the dashboard. So if you click "Past Due", the policies listed below will only be the Policies that are Past Due.
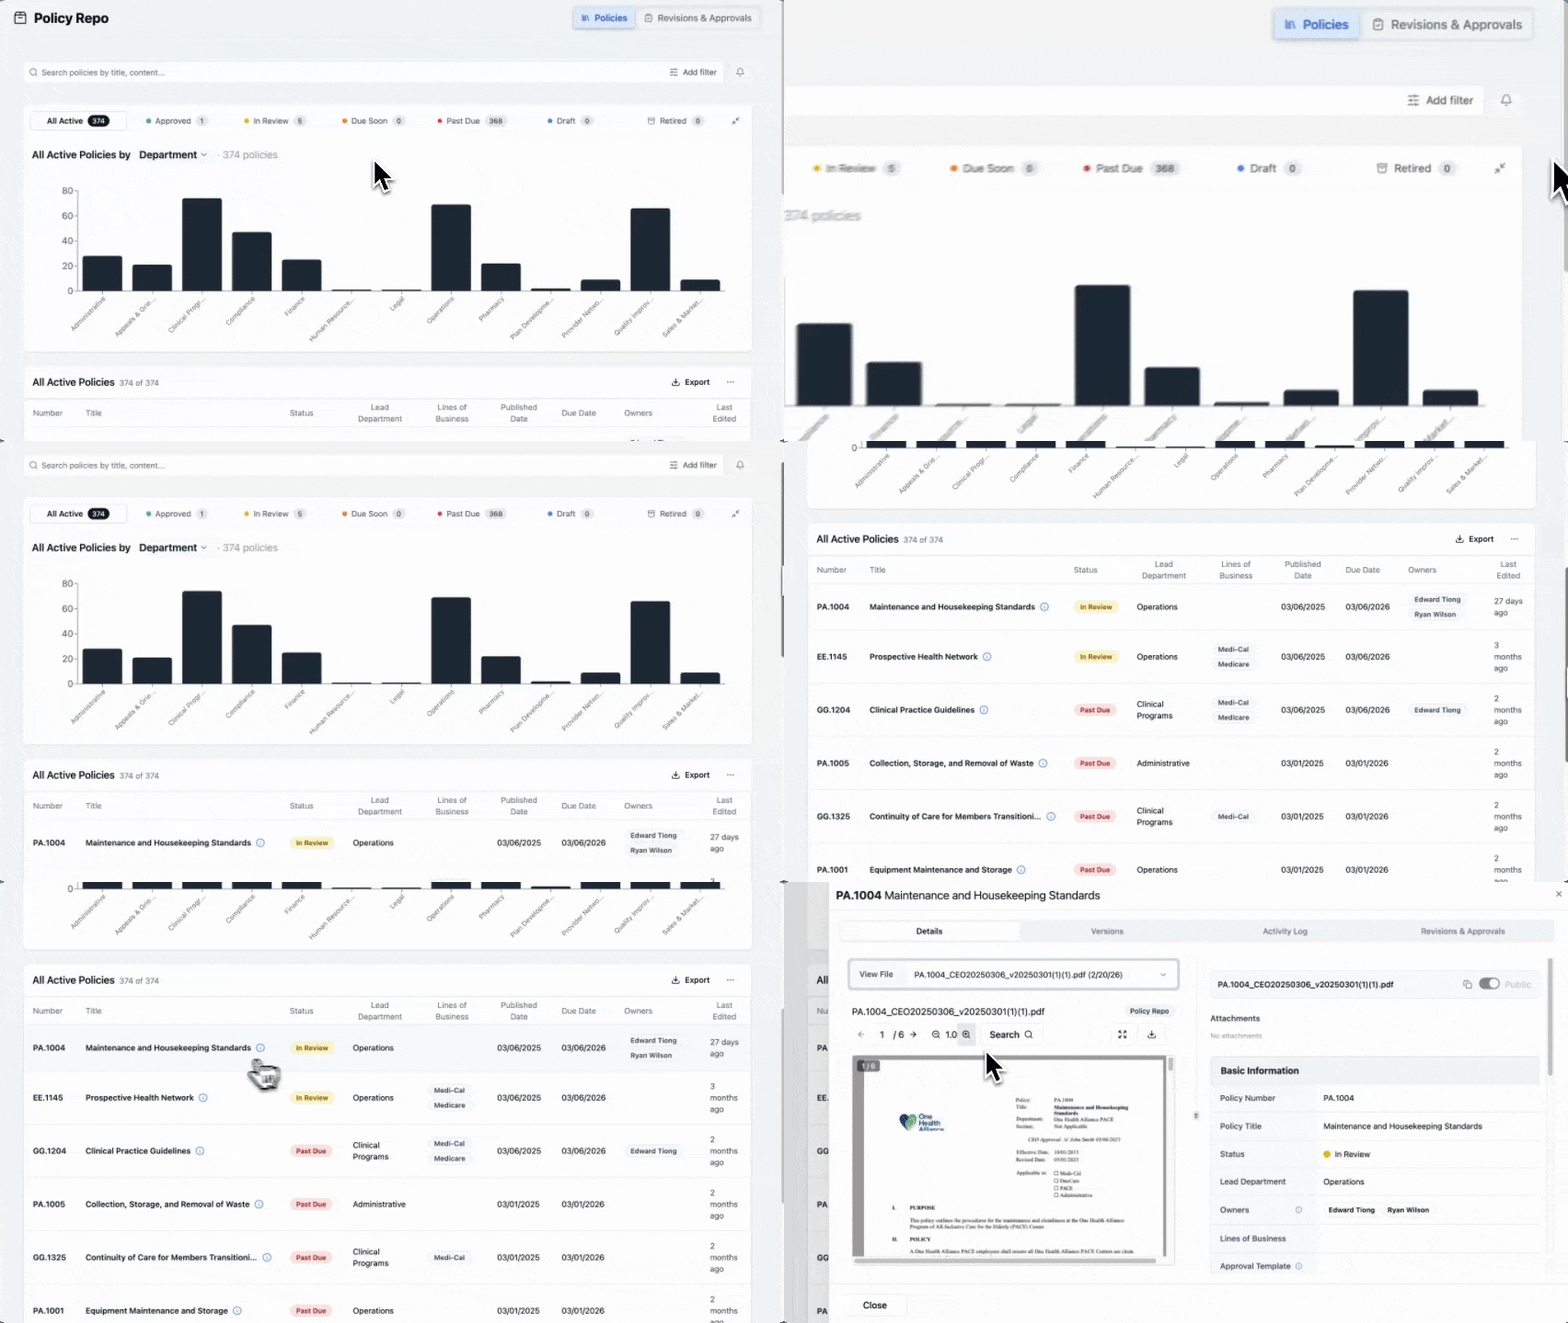
Manage and Review Policies
- Select a policy by clicking on the Policy # or Title.
Overview view:
- You can review the policy on the left, and the Content of the policy on upper right side of the screen. Content includes Policy #, Policy Title, Status, Lead Department, Lines of Business, along with Key Dates and Deadlines.
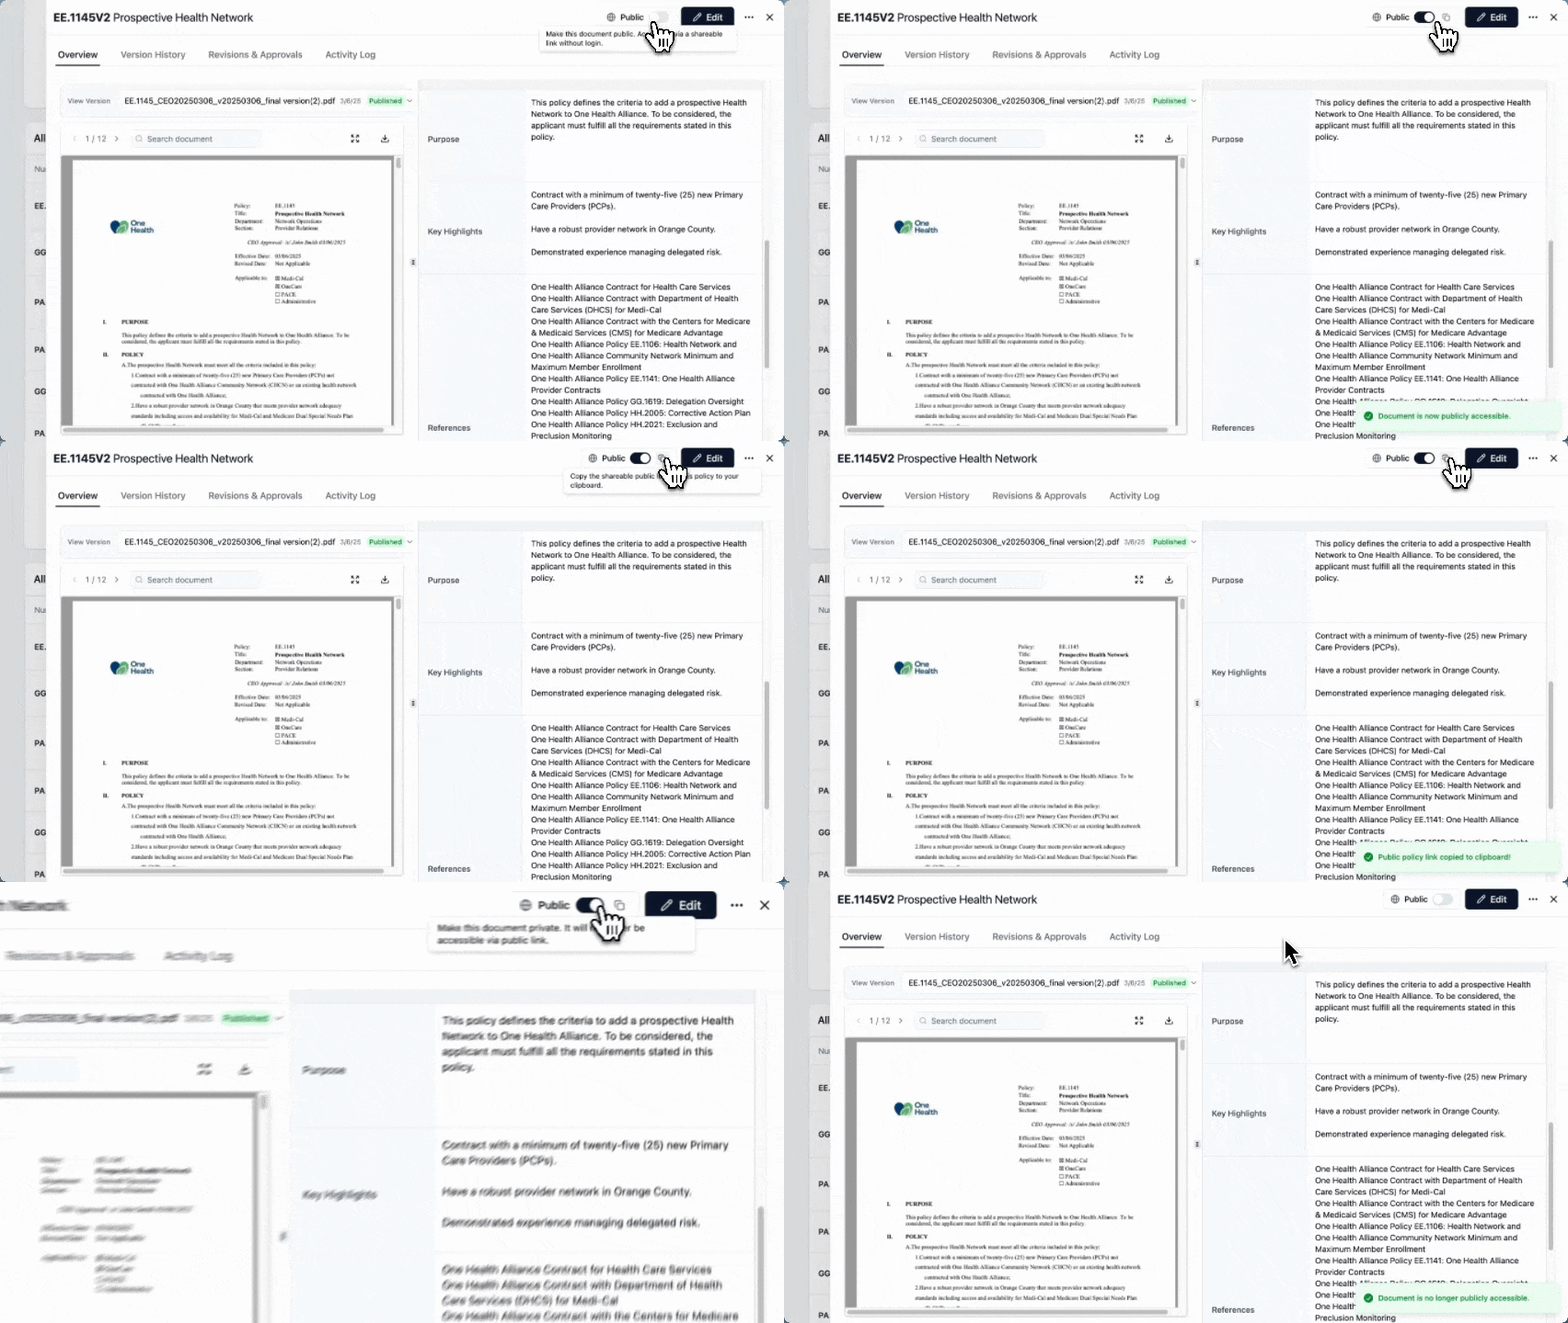
- Administrators may Enable or disable the policy's Public Settings in the top right corner. If it is greyed out, it is because you do not have these privileges. If you require these privileges but do not have them, please reach out to a Customer Success agent from Readily
- Once a policy is public, you can copy the URL by clicking on the double boxes that appear next to Public in the upper right hand side to copy the URL to your
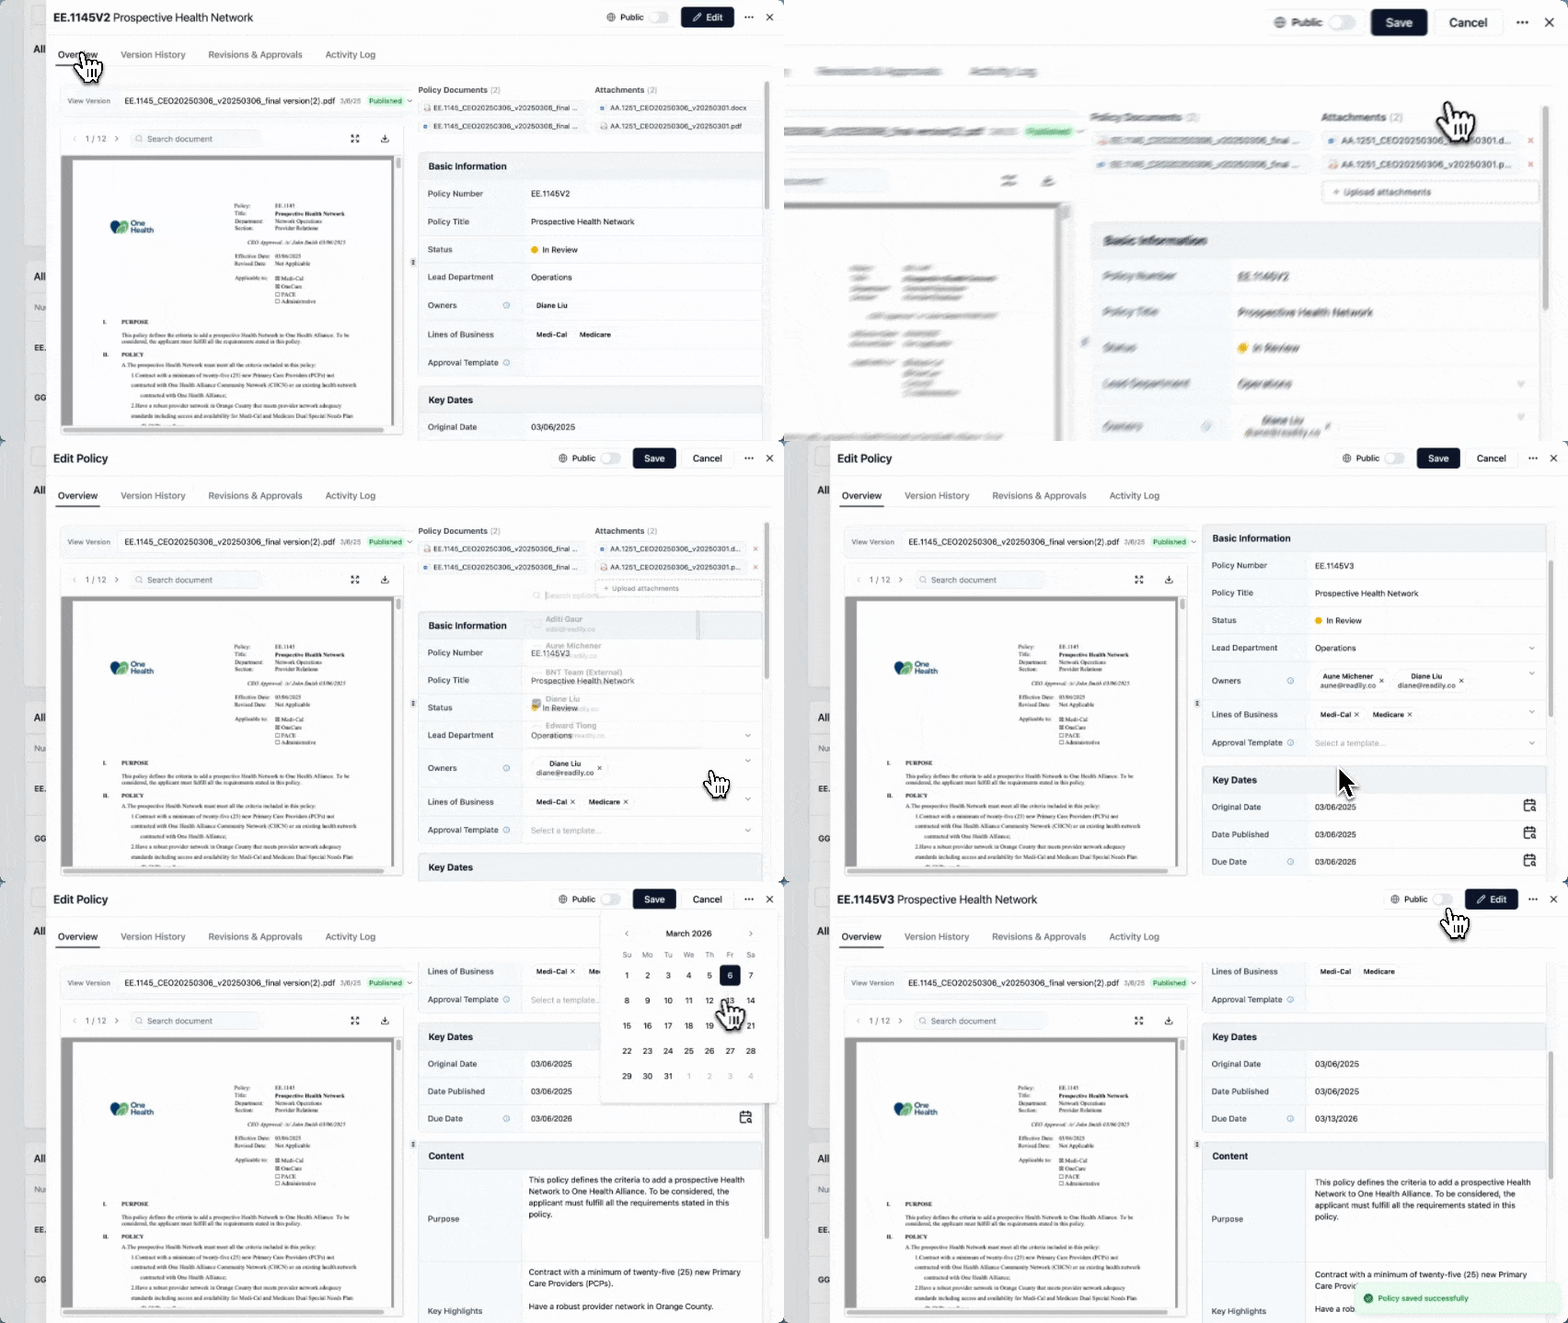
- Edit allows you to edit the basic information in the right section of the screen, update the policy name, number, status, assigning new owners, change line of business, alter due dates and change the content summary manually.
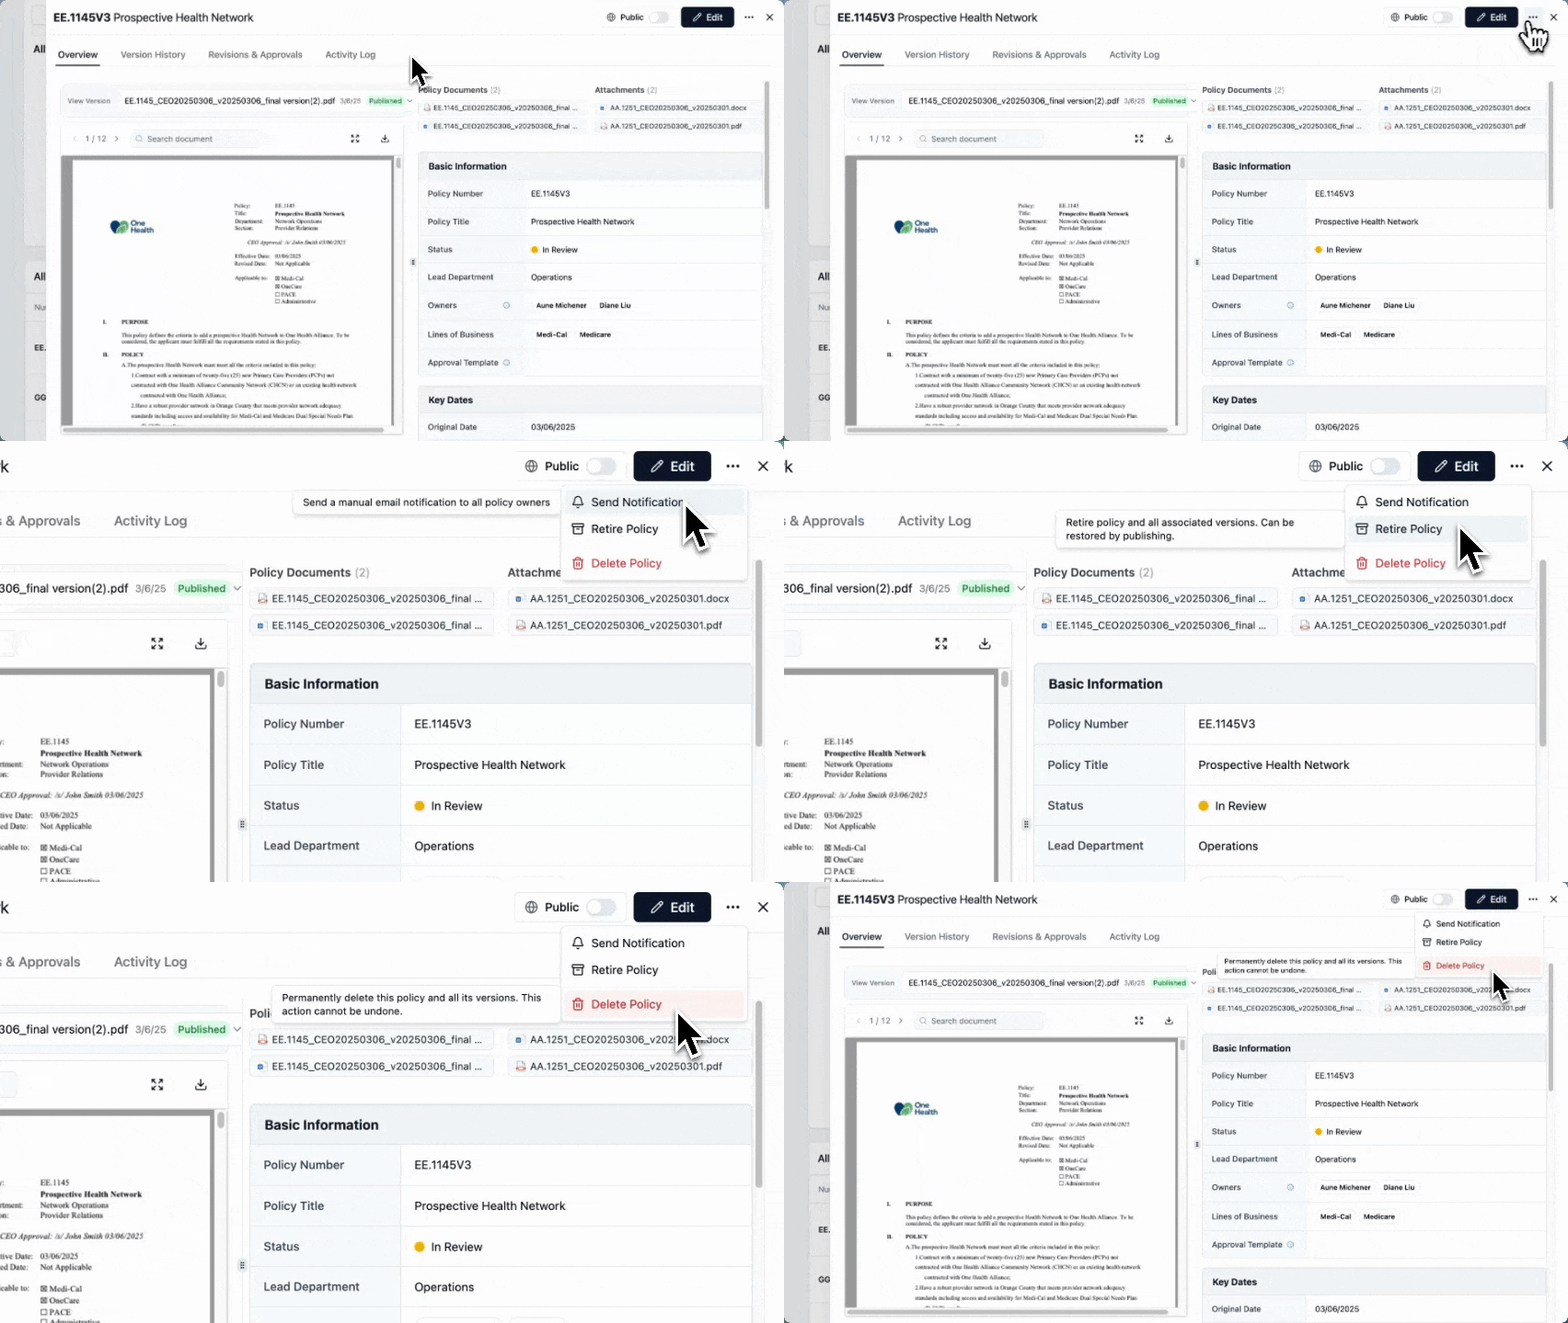
- At the top right you can chose to Notify Policy Owners, Retire or Delete the policy by clicking on the "..."
Version History view:
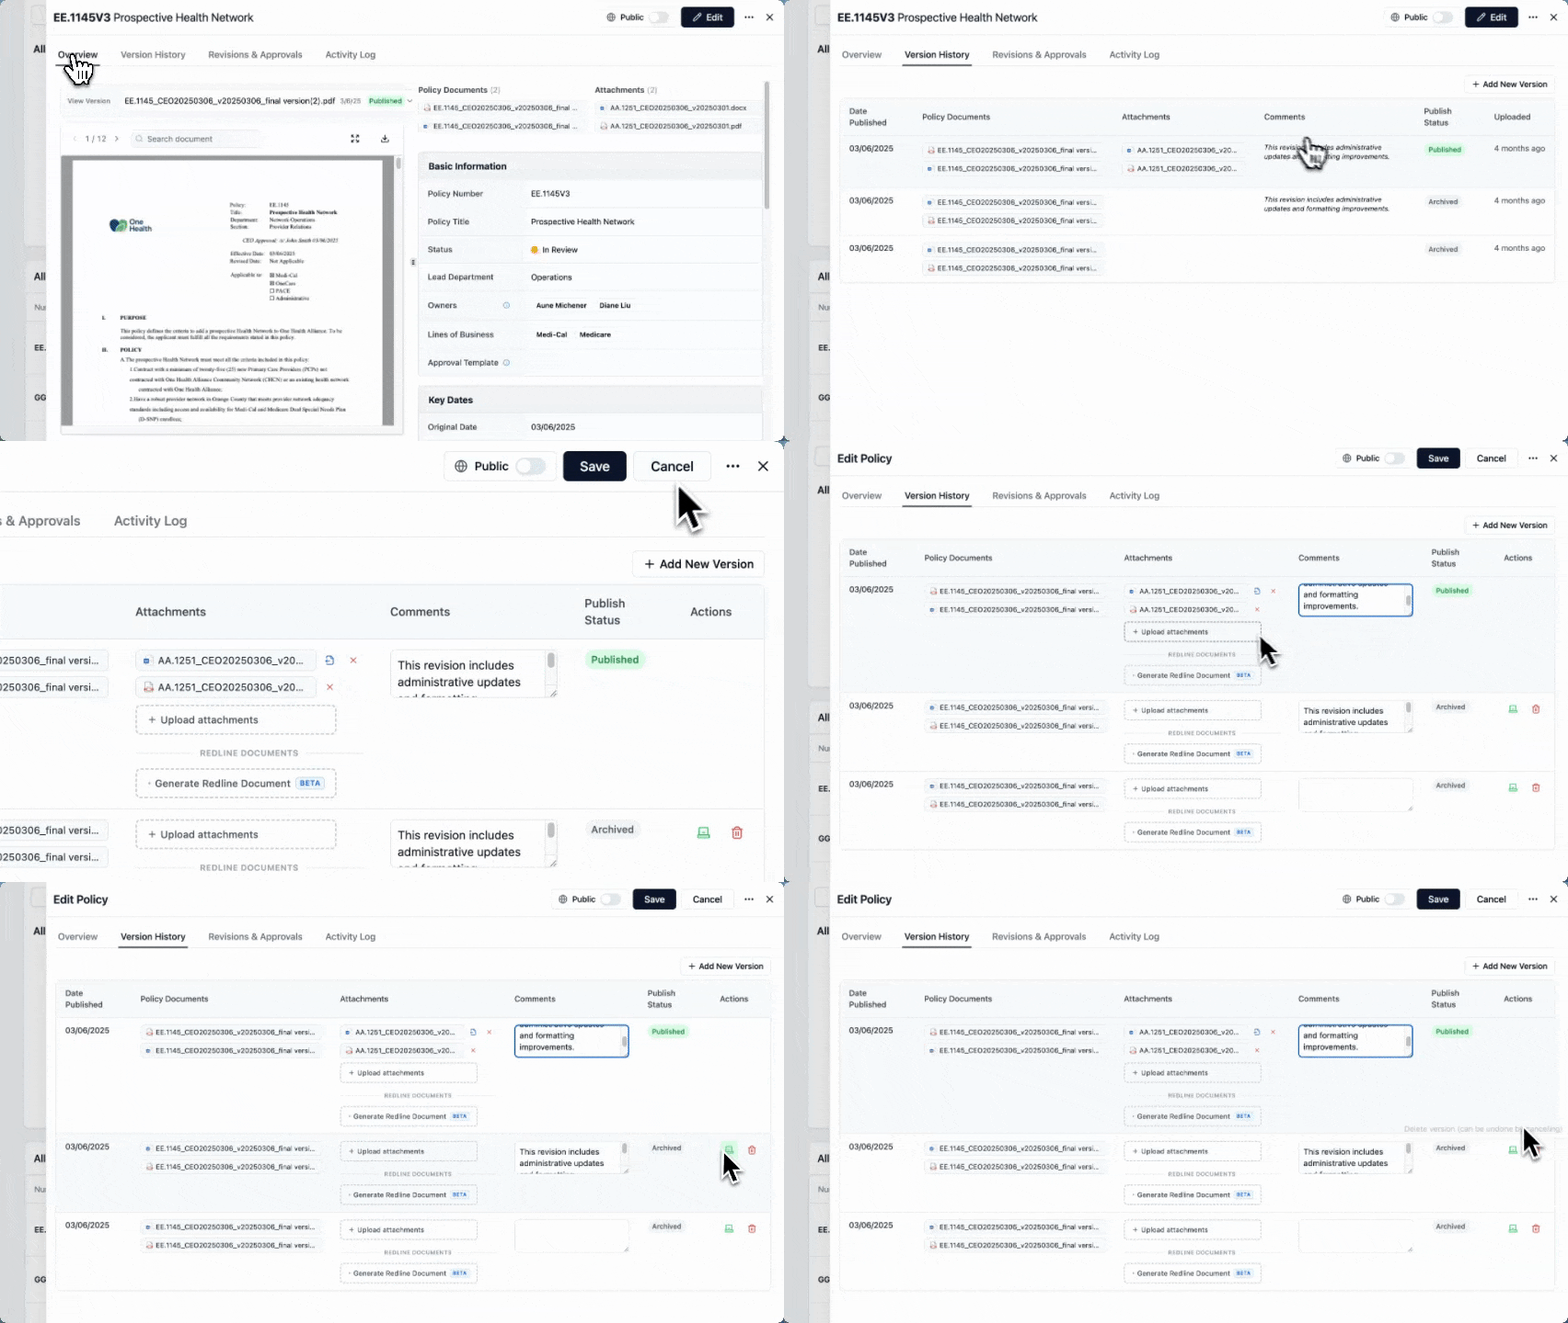
- Shows you the version history of the policy.
- By pressing Edit in the top right corner of the screen you can:
- Change which version is published
- Uploading additional attachments to a specific version
- Comment on a specific version
- Generating a redline document
Revision & Approvals view:
- When a policy is updated, Readily automatically tracks changes, creates a new version, and routes the document through predefined, multi-level approval workflows.
- Approval status, reviewers, and timelines are fully visible, ensuring clear accountability and audit-ready documentation.
- For Revision and Approvals, select New Revision/Approval.
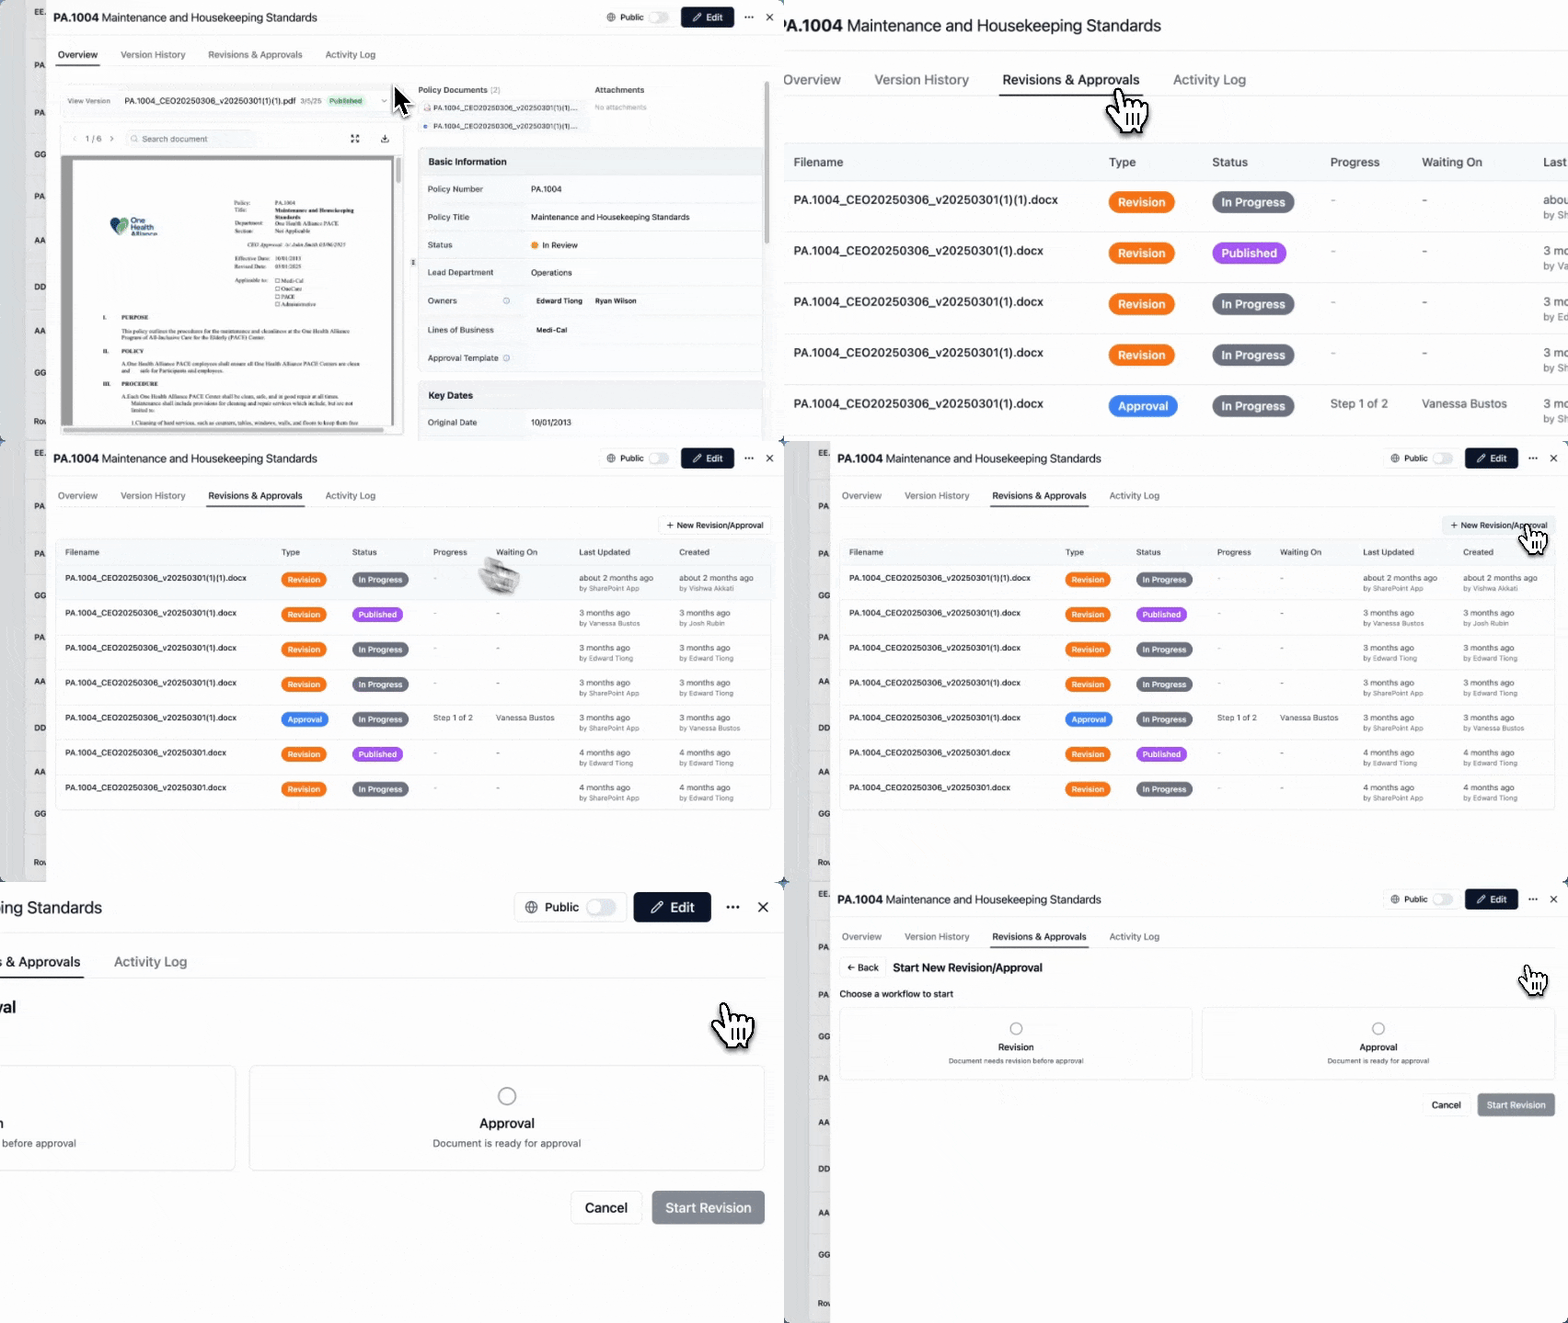
- Choose a workflow: Revision or Approval
Revision Process
1. Select Revision (left card)
2. Select Document Source
- Use Latest Version — uses the most recent published version. You will follow the process and open it in Sharepoint.
- Upload DOCX — a file picker appears below the cards labeled Select DOCX file to upload. Click Choose File, select your .docx, and confirm the filename shows next to the button. Much like using the Latest Verizon above, you will follow the work flow into Sharepoint to do the specific revisions.
3. Attachments
- No Attachments: no further action needed. Attachments can be added later from the revision progress screen.
- Upload Attachments: a file upload area appears below. Add your supporting files there.
4. Start Revision Click Start Revision in the bottom-right. All three sections must have a selection for the button to activate.
- This will take you to the Revision in Progress Screen
- Click the file name to get into SharePoint to make direct edits, summarize the changes, add last minute attachments and push it forward by Publishing Revision or to move forward with Approval
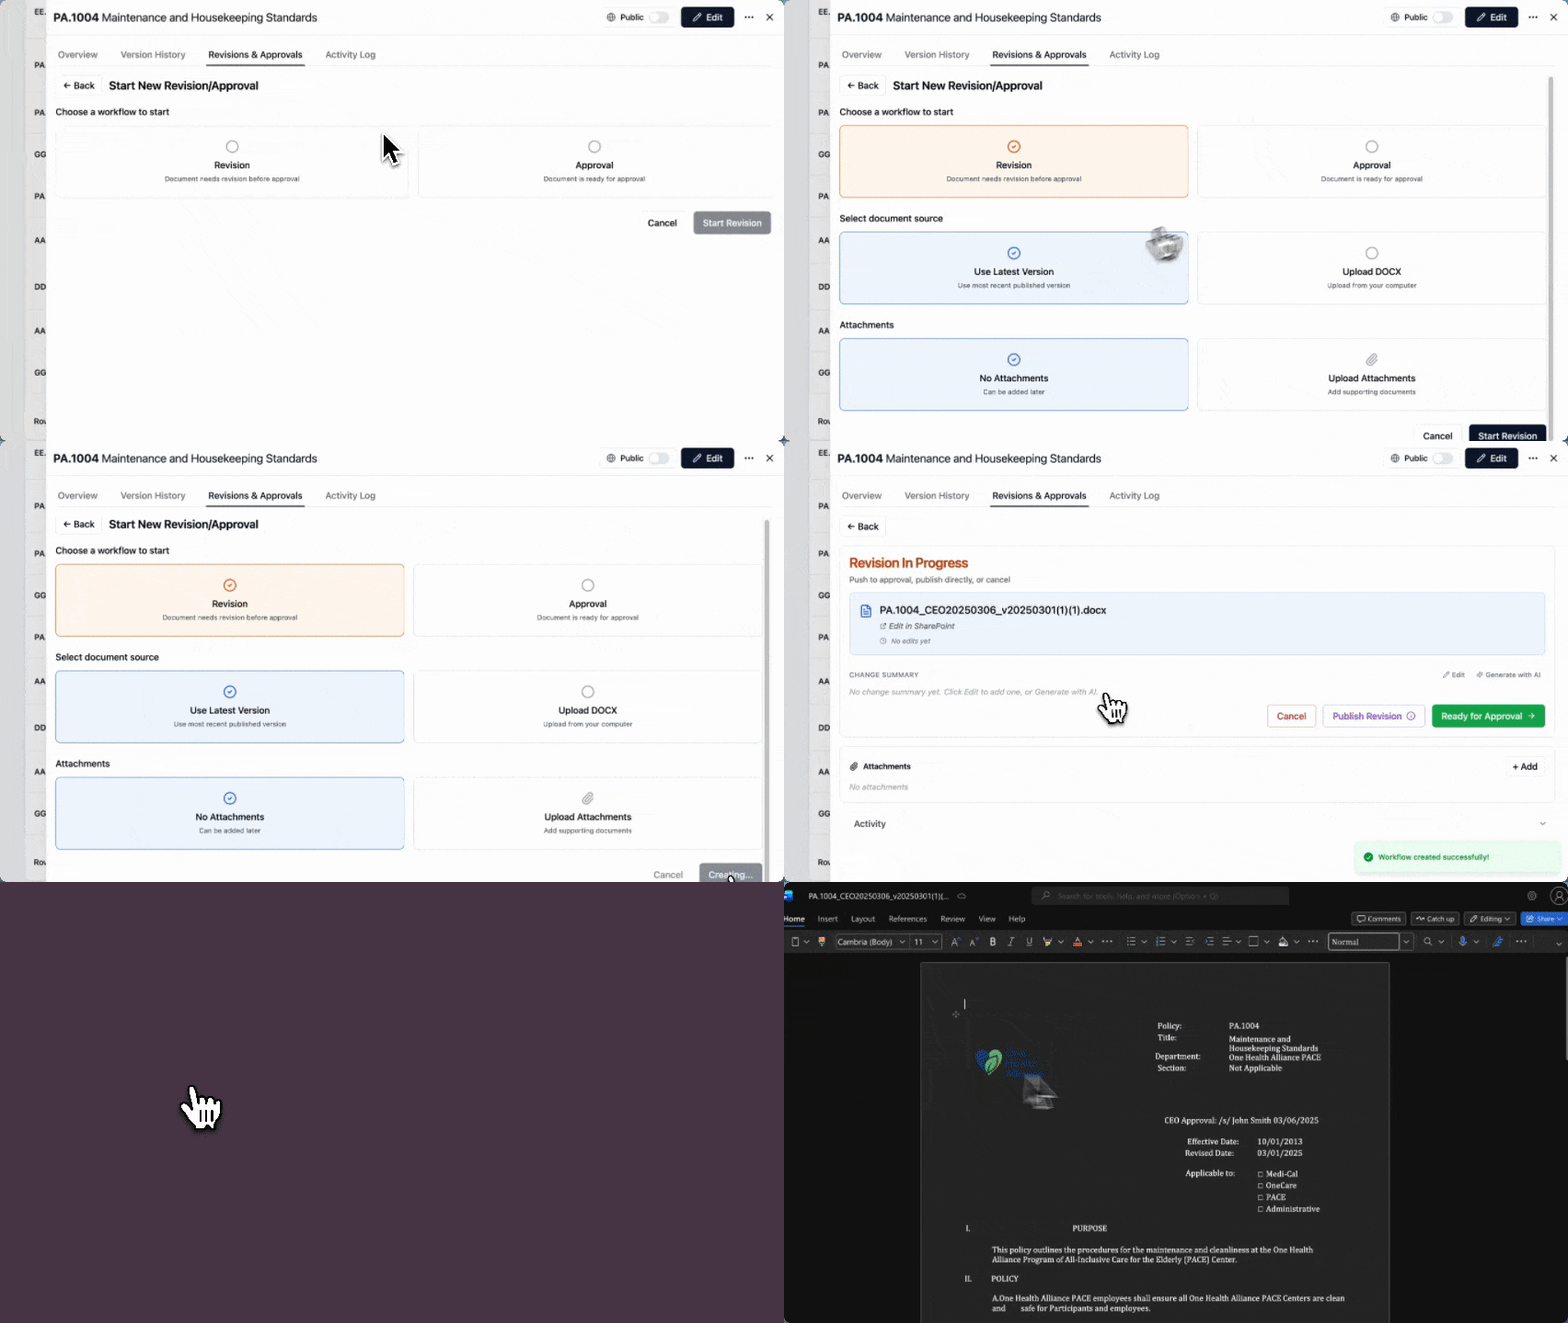
Approval Process
1. Choose a Workflow Select Approval. The card highlights green. Use Latest Version in the next section is automatically grayed out — this is expected.
2. Select Document Source Only Upload DOCX is available. Select it and a file picker appears below labeled Select DOCX file to upload. Click Choose File and select your finalized .docx.
3. Attachments Same as Revision — No Attachments or Upload Attachments. If you choose Upload Attachments, a file upload area appears below.
4. Configure Approval Workflow Scroll down on the same page to reach this section.
Load from template (optional) — if your org has saved templates for the approval process of policies, select one to pre-fill levels and approvers. Otherwise leave as None.
Approval levels — at least one is required. For each level:
- Level name — editable field, defaults to Level 1. Rename if helpful (e.g. Department Head, Legal).
- Due date — optional. Enter a date (mm/dd/yyyy) for when this level should complete.
- Add approver — click the dropdown, search by name, and select. The approver appears below the dropdown with their name and email. Repeat to add multiple approvers to the same level.
- Require signature — checkbox next to each approver. Check if a formal e-signature is required rather than a simple approve click.
- Add comments (optional) — free text field at the bottom of the level block for notes or instructions to approvers.
- Remove an approver — click the × next to their name.
- Remove a level — click the × at the top-right of that level block.
To add another approval level, click + Add Approval Level. A new level block appears with the same fields. Levels run sequentially — Level 1 must complete before Level 2 is notified.
5. Start Approval Workflow Click Start Approval Workflow in the bottom-right. The button activates once a DOCX is uploaded, an attachment preference is set, and at least one approver is assigned to Level 1.
Activity Log view:
- List of user activities who made updates to the policy.

Configure Approval Workflow
Set up an approval workflow to support collaboration when policy revisions require input from multiple members. This workflow enables policy owners and designated reviewers to review changes, provide recommendations, and ensure policies are aligned before final approval.
- Select the Policy for Revision. Then click Ready for Approval.
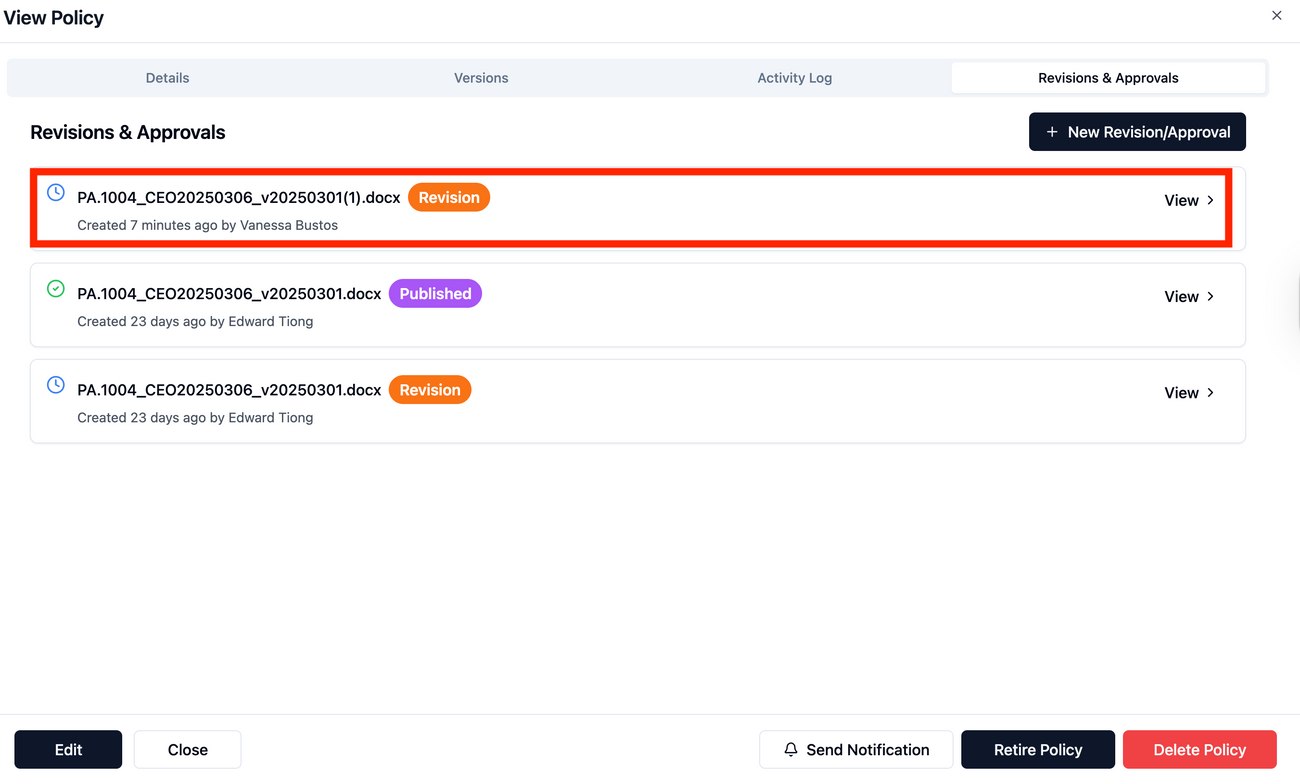

- Configure the Approval Workflow.
- Add the title (optional)
- Add Approver from the drop-down list
- Add a due date (optional)
You can add multiple users to collaborate on the policy workflow. Only the Admin has the final approval. Once the workflow is added, select Start Approval Process.
Note: Users added to the workflow will receive a notification via email. When you add a comment and @ the user, they will receive a notification via email as well.

- Start editing the policy by selecting View in SharePoint. From this section, you can Approve, Reject, or Send Back to Revision.
- Final step: Publish Policy.

Policy Repository Access Levels
Member Access
Users with Member access can manage and maintain policies they are assigned to, including:
- Metadata updates
- Revise and Edit
- Workflows
- Related policy changes
Policy Admin Access
Policy Admins have full access across all policies, including the ability to:
- Create and revise policies
- Approve and submit policies
- Create and manage workflows
- Update any policy
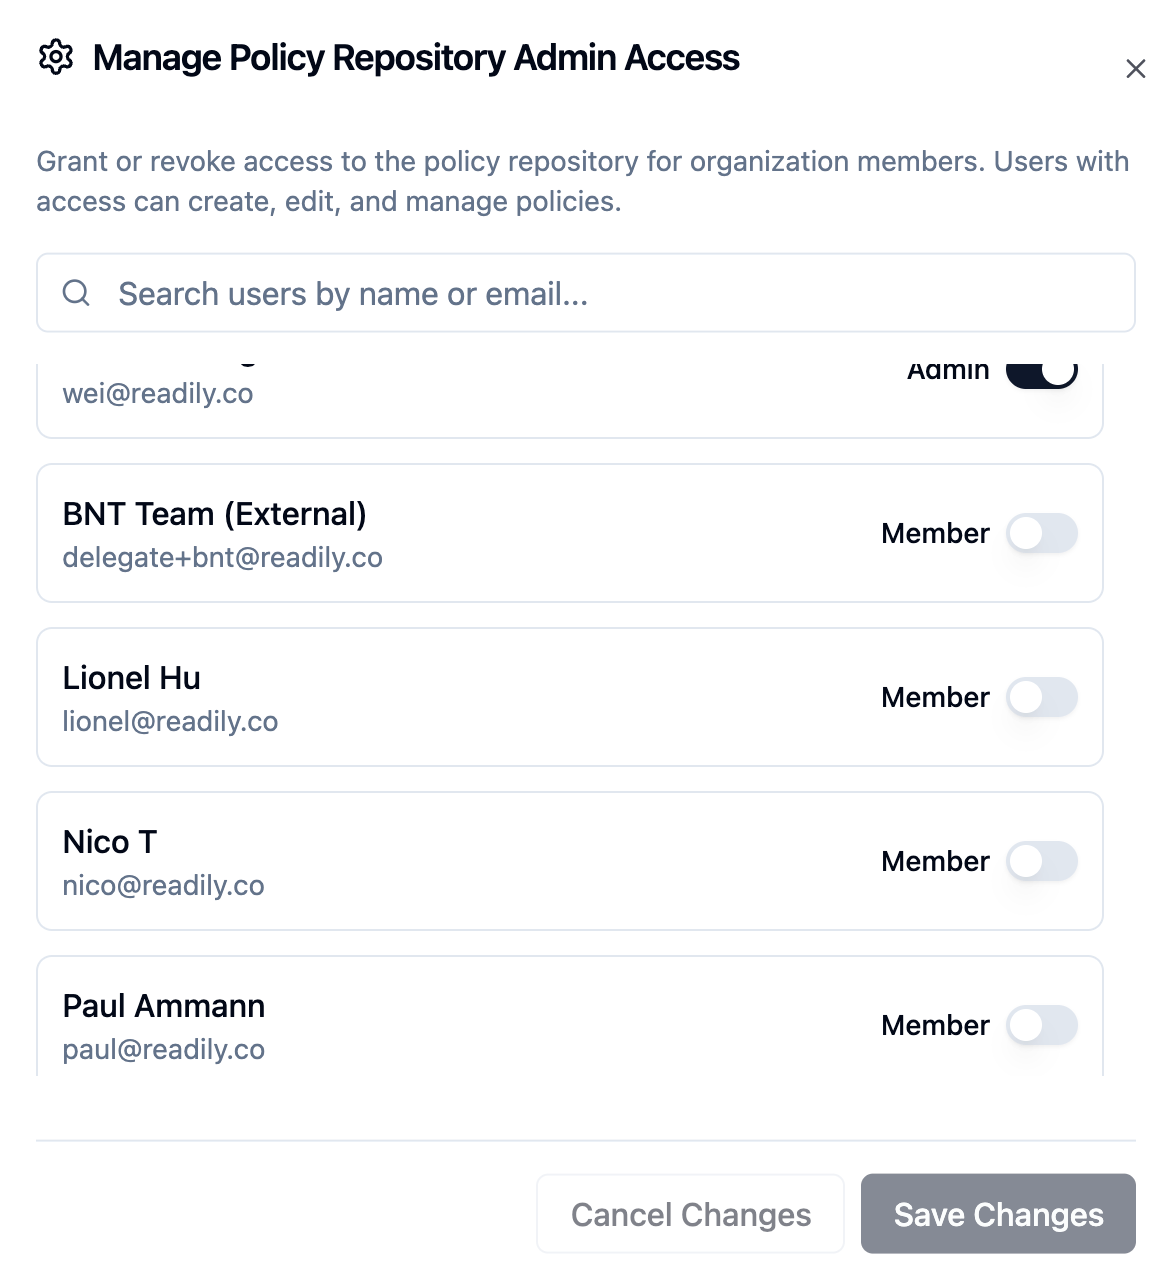
- Grant or revoke Policy Repository access for organization members
Access Control
- The Admin(s) can grant or revoke access to the Policy Repository for organization members. Admin access can create, edit, and manage policies.
- Set the access level to Member. The member has limited capabilities and won't have the capabilities to update the policies.

- Toggle On/Off to enable and disable access. Click Save.
Filtering and Policy Search
- Search policy by title.
- Filter by Department, Line of Business, and Publish Date.

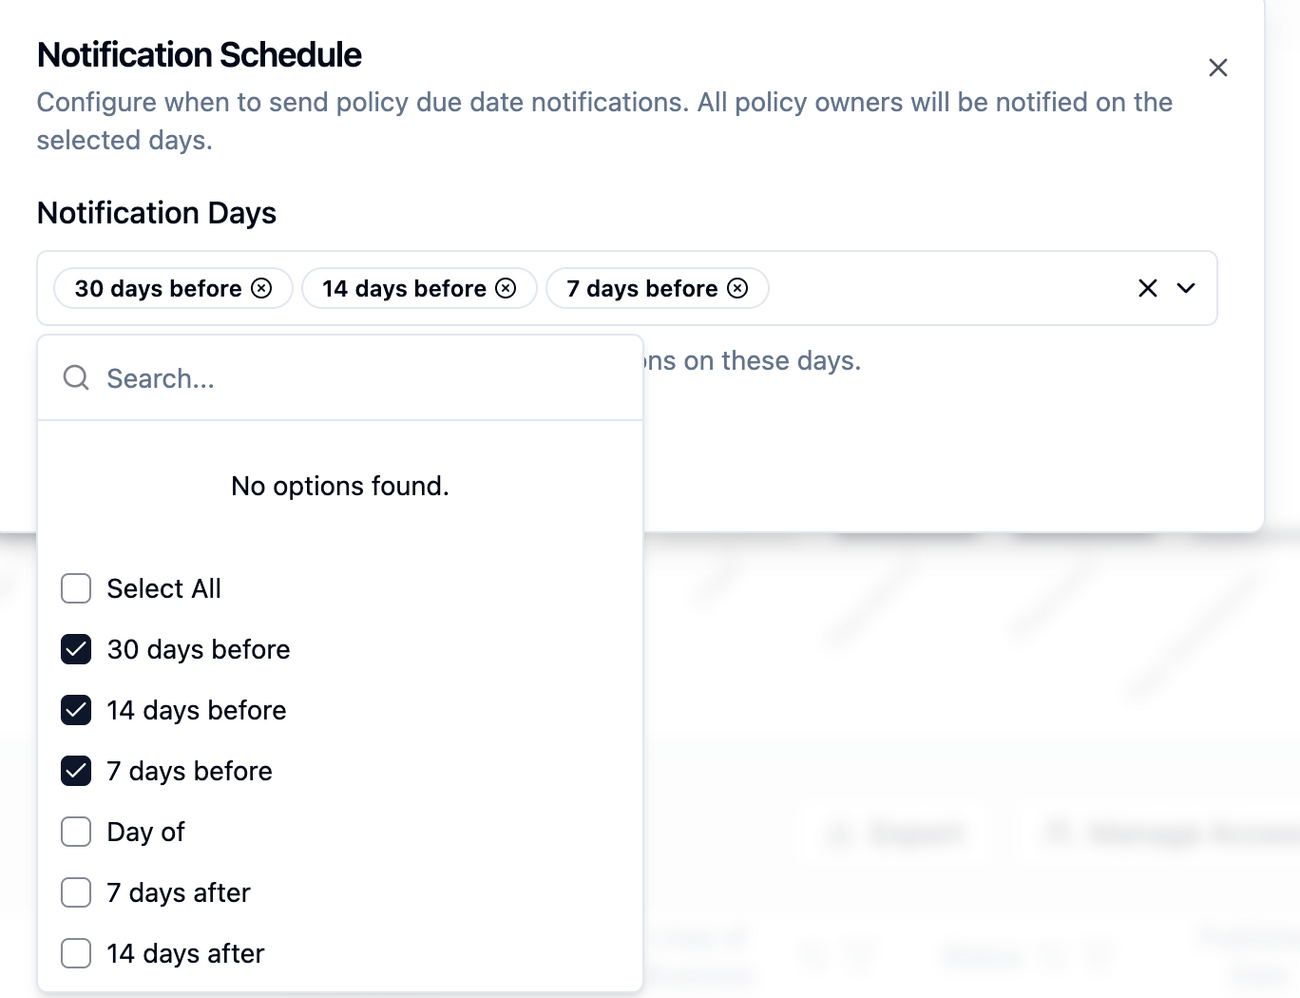
Notification Schedule
- Set a notification schedule for the policy owners.
- Policy owners receive automated notifications for upcoming reviews, required revisions, approval requests, and status changes to ensure policies remain current, compliant, and on schedule.
- In the Policy Repo, navigate to the notification.
- Select a notification schedule. Once a schedule has been selected, click Update Schedule.

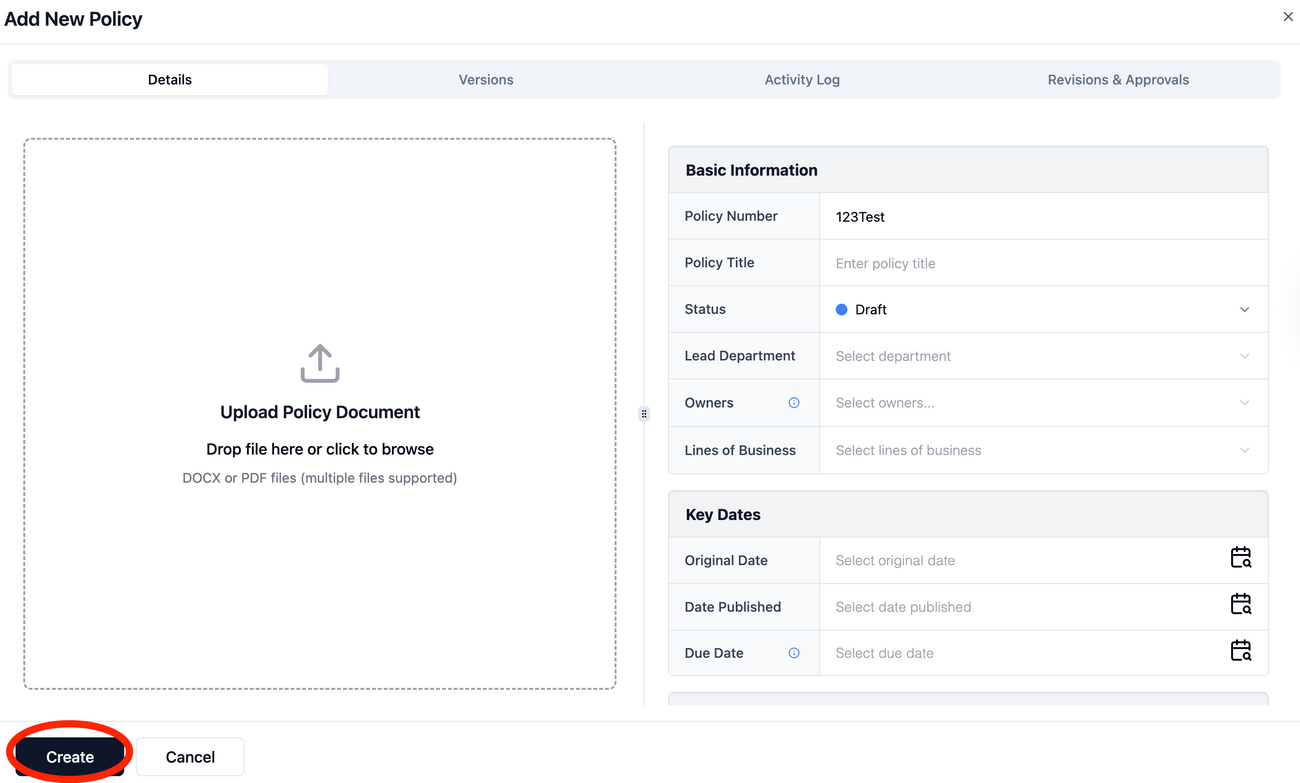
Add Policy
- If you're an admin, you have the ability to add a policy.
- To add a policy, navigate Add Policy.
- Upload the policy (PDF or DOCX version)
- Fill out the Basic Information and Create.